Tuesday, May 3, 2011

Week 18: Triple Flower Mother's Day Card

Mother's Day is coming up, and you've got to give Mom a card. Will it be a store-bought Mother's Day card with sentiments written by someone else, or will it be a card handmade with love for the mothers and grandmothers and women in our lives who have mentored and loved us? Well duh. Obviously, we'll go with option #2.

My mother loves gardening, so this card is floral feast, with three kinds of flowers: a real, pressed flower, an image transfer flower image, and a "mom" decal on floral paper. Yum. Let's get started.
Three kinds of flowers on this mom's day card

What you need
For the pressed flowers:

  • flower press or big, heavy book
  • fresh flowers, preferably ones with few petals
For the image transfer:
  • magazine images
  • soft gloss gel (Liquitex)
  • paintbrush
  • small tray (a toaster oven tray works well)
For the card:
  • blank card and envelope
  • pigment ink (Palette)
  • scissors and decorative scissors
  • craft glue
  • collage glue (Mod Podge)
  • German foil trim (can be found online at 32 Degrees North)
  • double-sided foam tape
  • rubber stamp or sticker with a Mother's Day theme ("mom" or the like)


Some of the things you need, clockwise from left: craft glue, Mod Podge, scissors, craft scissors, blank card, German foil trim, flower press, pigment ink, stickers, double-sided foam tape

Step 1: Pressed flowers
Gather some flowers, and using a flower press, press the flowers between the leaves. Or, if you don't have a flower press, put them between the pages of a big, heavy book. Many-petaled flowers, such as roses, don't press as easily as small flowers such as pansies. This card uses a Lenten rose (hellebore).

After a few days, check your flowers. They should be pressed flat and dry to the touch before you use them.


Step 2: Image transfer
First we'll take a printed image and spiff it up so that it's card-worthy. We could just glue a cut-out magazine picture straight onto the card, but that's kind of tacky looking: it has that thin glossy magazine paper look, and there's other stuff on the back side of the image. We'll take the image and transfer it onto a hardened gel "skin" that we can then glue on to our card.
Brush a coat of gel over your images and let them dry. I'm doing a batch here, to use in other projects. Then brush on four more coats, letting each coat dry between applications. Each coat dries quickly - in about fifteen minutes.
When the last coat of gel is dry, put your image paper-side down into a tray filled with water. Let it soak for a minute or so, or until the paper is saturated.
Take out the image, turn it over, and start rubbing the paper away with your fingers. Presto! You can see the picture from the other side start to show through. Keep rubbing until you've removed all the paper. You can get any stray bits with a Magic Eraser.
Use decorative scissors to trim a pretty border around your image.

Step 3: Putting it all together

With our pressed flowers and image transfer ready to go, let's put all the pieces together and add some finishing touches.

Start by inking the borders of your card, leaving the middle clear. The image transfer becomes transparent, so if you have a dark-colored background, when you glue down the image, it'll look murky.
Add a little dimensional embellishment by cutting a small piece of floral paper and sticking a clear "Mom" sticker on it.
Glue the image transfer down with craft glue, and carefully glue the flower with collage glue (you can see the wet glue in this photo). Then take the little "Mom" embellishment and attach it with double-sided foam tape so that it sticks up a little.
The card didn't look quite done, so I added some blue German foil trim under the "Mom" and along the bottom of the card. Adding a little shiny trim really makes a difference. I also used a metallic pen to color the edges of the image transfer, adding some sparkle.

Happy Mother's Day, and happy card-making!

Wednesday, April 27, 2011

Week 17: Paper Casting with Kleenex

You've probably found plenty of uses for Kleenex. Nose blower, makeup remover, spill wiper - but how about art material?

The finished piece, with embossed suns created with . . . Kleenex.

Paper casting involves making dimensional forms with paper pulp and molds. We're going to do faux casting here, with Kleenex and rubber stamps. Much easier, less messy, and uses materials you already have around the house! The smooshiness of the Kleenex lends itself perfectly to embedding in the grooves of a rubber stamp. Using multiple layers of tissue, you end up with a 3-D, embossed image that you can then affix to paper and seal with a medium. Painting over it with metallic paint gives it a look similar to pressed-tin ceiling tiles.

This project is based on techniques learned in Teach Yourself Visually: Collage and Altered Art by Roni Johnson.

What you need

  • Kleenex
  • spray bottle
  • rubber stamp
  • pigment inks
  • polymer medium (Golden)
  • paintbrush
  • acrylic paints of your choice (I used antique bronze metallic paint, alizarin crimson, and hansa yellow)
  • cardstock

What you need, clockwise from left: spray bottle, polymer medium, Kleenex, paintbrush, acrylic paints, rubber stamp, pigment inks

Start by turning your rubber stamp face up and inking it thoroughly. The darker or more saturated the ink you use, the clearer your final image will be.
Cut pieces of Kleenex so that they overhang the edges of the stamp. Then press down a piece of tissue over the stamp and mist it thoroughly with the spray bottle.
Add another piece of Kleenex, mist it, and press down (don't rub; it'll tear the tissue). Keep pressing over the entire image; you'll see the stamped image start to show through. Continue adding tissue, misting, and pressing, using five tissues altogether. 
Pull up the wad of tissues. Your image will be clearly inked and embossed. Here, I inked the same image with four different inks. Clean your stamp pad with baby wipes in between colors, and let it dry.
Let the tissues dry for a while till they're damp but not soaking wet anymore. If you let them dry completely, then the tissues will separate, and your nice thick impression will be lost.
Once the tissues are damp to the touch, brush polymer medium on a piece of cardstock and press the casting down onto the cardstock. Then brush carefully over the top of the casting, sealing it down onto the paper. The medium acts as a sealant for the casting so that it doesn't separate, and it also enables you to paint over it later.
The sealed casting should dry overnight. The next day, you're ready to proceed.

Here are the sealed castings after drying. They're looking pretty good but they still have that "Kleenex-y" look around the edges. Time to fix that.
Using watered-down acrylic paint, start painting over your castings. Here I mixed alizarin crimson with metallic antique bronze. The metallic works particularly well on the castings, really highlighting the embossed texture.
At this point the casting is just about ready. I added some yellow to the castings after taking the preceding photo; as you can see in the finished picture below, the yellow was that missing touch that really helps the images pop out and gives the stamped suns some warmth.

When you're happy with the look of your casting, you can cut it out and use it for card-making or mixed media projects. I turned the castings into a little art piece here, using some leftover bits from other projects: a fused glass oblong and an art metal frame that's embossed and inked with alcohol inks (read more about that technique in Week 13).
The finished piece, using leftovers from other projects.
You can do paper casting with other materials besides Kleenex, but the few other options I tried - tissue paper and gampi paper - just don't have the pulpiness of facial tissue, and didn't come out as three-dimensional.

Besides, this is probably the prettiest Kleenex ever gets. Have fun!

Sunday, April 17, 2011

Week 16: Lei Making - Haku Style

In Week 15, we strung leis on thread. This week, we'll do a different style of lei making: a traditional braided lei, called haku style. Before thread and needles were introduced to Hawaii, one way to make leis was to braid the flowers into dampened ti leaves, creating a beautiful natural necklace or hair ornament. Ti leaves aren't as easily available as old bedsheets, though. So feel free to rip up some soft old sheets to long, thin lengths and use those instead.

Here's a flowered hair "scrunchy," woven with ti leaves and carnations:
You can attach this pretty braided hair ornament with bobby pins or tie underneath.
What You Need

  • carnation heads or flowers of your choice
  • damp ti leaves or long fabric strips (old bedsheets or light, soft fabric)
  • optional: hook and block of wood, for leverage

Start out by tearing your fabric, either long enough for a necklace length or shorter if you're going the flowered hairpiece route. Then tie one end, leaving a couple inches extra at the end.

It helps if you have something to use for leverage as you braid. In the class I took at the Kaanapali Beach Hotel, we used a block of wood with hooks screwed into it. We stuck the tied end over the hook, as seen here:

Ti leaves hooked onto a block of wood, for leverage
Then we could stand up and pull hard on the leaves, helping to pull each braid tight. If you don't have a block of wood set up, don't worry. Just go ahead and braid, making sure to pull each braid as tight as possible.

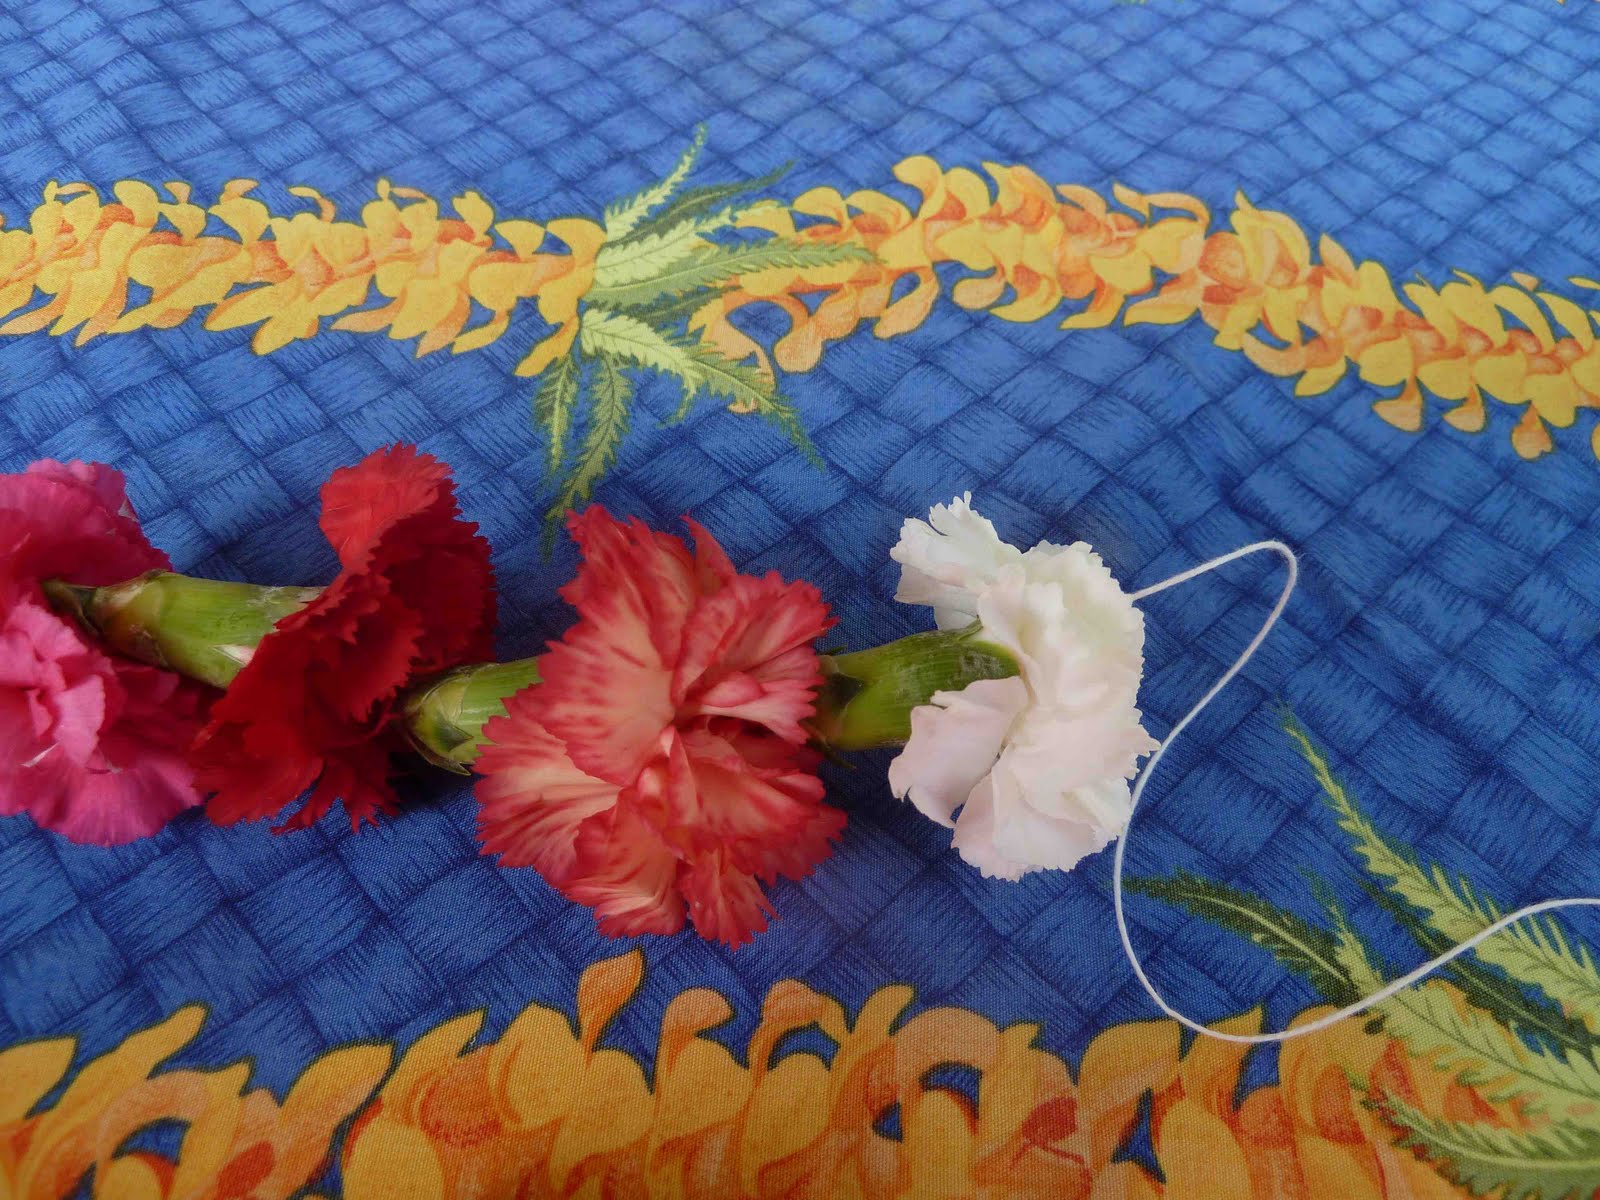
Start by braiding four braids. Then, on the fifth braid, start adding flowers. Add a flower for each left and right braid that you make. The bottom of the flower head should be pushed below the braid, and the top should be above.

Braid four times, then start braiding in the flowers to the left and to the right.
The only thing holding in the flowers is the tightness of the braid. Pull hard on each braid to make sure it's really tight after you add in each flower.

Here's how the lei looks from underneath. You can see how the bottoms of the flower heads poke out underneath each braid.
Finish the lei by braiding four times at the end (without flowers). Then tuck the middle piece of braid underneath and tie the left and right ends together, again leaving a couple inches of leaf or fabric at the ends. You can use these loose pieces to tie the lei together, or to attach to your head with bobby pins.
The finished lei hair "scrunchy." You can't see the braids from the top, as the flowers fan out over the braided areas.
It's beautiful and fragile; to prolong the life of your lei, put it in a paper bag in the fridge. And then spend one evening with the prettiest hair scrunchy you'll ever wear.

Friday, April 15, 2011

Week 15: Lei Making - Kui Style

Fresh from a trip to Hawaii, our projects this week and next week will revolve around lei making. While in Maui, I learned to make two different kinds of leis: a threaded kind, called kui style, and a braided kind, called haku style. This week's project is a kui-style lei. Here's how it looks:


Okay, it would be more authentic-looking with plumeria blossoms, and in fact, stringing the carnations wasn't so easy, because they have so many petals they tended to fall apart. But this carnation lei proves that you can make a lei from just about any flower you can string a needle through.

What you need

  • lei needle
  • 36 flowers of your choice - carnation heads, plumeria blossoms, or whatever you may have available
  • strong thread or dental floss 

What you need, from top to bottom: thread, lei needle, carnation heads
Here's a closer look at the lei needle. It's a long needle with a hook at the end that you hook the thread through. Leave a few inches of thread hanging after hooking it onto the needle.
Push the needle through the bottom of the flower and out the top. Then gently push the flower down the needle and onto the thread. Once it's off the needle, pull on the thread rather than the needle to push it down till it's a couple inches from the bottom.
Continue threading and pushing the flowers down the thread, pushing them close together. 
If the thread frays, as it tends to do when hooked onto the needle, cut off the frayed part and re-thread - cut an extra long piece of thread for your lei to leave room for fraying. When you're done, double-knot the ends and cut off the excess thread. And, as the instructor at the Kaanapali Beach Hotel told us, think good thoughts while making your lei, and the lei will come out as smooth and beautiful as your thoughts.

Sunday, April 3, 2011

Week 14: Seven Sunflowers

This week's project: seven sunflowers, ready to grow.

April 3: small sunflower seedlings

There's not much to this project, because I didn't do this the old-fashioned way, planting sunflower seeds, watering them, waiting, and watching them sprout. Instead, I bought seven sunflower seedlings at the wonderful annual Spring Garden Market here in San Jose, a gardener's dream veggie-and-flower market on the first Saturday of April every year.

I planted them in one of the few empty spots in my small backyard, and tied them to stakes with plastic gardening twine to help them grow straight. It's dry all summer here in San Jose, so I also ran drip tubing to each sunflower to water them automatically every few days.

Let's watch them grow over the next few months. They're so tiny now, but they hold the promise of summer already.

Here are our sunflowers on April 24 - wow - a couple feet high already. The yarrow plants they were planted around grew too. We'll check in again in a few weeks . . .


On May 20, the sunflowers are now higher than the fence. In fact, they got so top-heavy yesterday that some of them fell over and I had to tie them back up to their stakes. The yarrow is blooming underneath them (those are the yellow flowers to the right) and the pink roses are blooming to the left. Soon they'll be blooming!

Saturday, April 2, 2011

Week 13: Metal Mermaid

There's something so compelling about metal - it's shiny, it's smooth, and with lightweight art metal, you can do just about anything you'd like with it. You can cut it with scissors, distress it, emboss it, punch holes in it - and for this week, create a piece of (somewhat) outdoor-safe art. Building on the sea themes of the last few weeks, we'll create a mermaid, and as a bonus, a little fishy friend for her.

Mermaid made of embossed, inked metal

What you need

  • paper, pencil, eraser, and scissors
  • colored art metal (Ten Seconds Studio)
  • medium weight pewter-colored art metal (Amaco ArtEmboss)
  • 1/8 inch hole punch
  • brads (Tim Holtz Idea-ology mini fasteners)
  • paper stump, fine-point stylus
  • sanding block
  • art metal mold (Ten Seconds Studio) 
  • alcohol inks and alcohol ink applicatr (Ranger Adirondack)
  • glue dots (Zots)
  • popsicle sticks
  • seashells

Some of the items you need, clockwise from left: art metal, art metal mold, scissors, sanding block, paper stump, glue dots, popsicle sticks, seasehlls, brads, alcohol inks and alcohol ink applicator
Here's how to create the mermaid:
Sketch out your mermaid on a large sheet of paper. Note where the jointed parts will be: neck, elbows, hand, tail.
Place the pewter art metal underneath the paper. Using a fine-point wood stylus (or any sharp-pointed tool), trace over each part of the mermaid. The impression will transfer to the metal.
Cut out the pieces, punching holes for the jointed parts.
Put the mermaid together with brads and, using scissors, make any adjustments needed to the shapes. Then take the tail parts off so you can emboss and color them later.
Using a gold piece of art metal and the wood stylus, draw stylized shapes for the hair and cut them out.
Time to emboss! Using the paper stump, rub some embossed patterns into the hair and tail.
Use the sanding block to rub over the raised areas, removing the color from the raised spots. Wipe down the metal with a damp paper towel.
Here are all the embossed pieces, ready for coloring.
Add alcohol ink drop by drop onto the applicator felt in your chosen colors, then use the applicator to stamp the colors all over the embossed pieces. The more times you stamp with the ink, the more saturated the colors will look.
Apply glue dots to the hair pieces and stick them on in a wild and wavy pattern. The glue dots are quite strong; you'll only need one per piece of hair.
Put the mermaid pieces back together with brads, turn her over, and using glue dots, apply the popsicle sticks to the back of the body parts to give the girl some structure so she doesn't flop around.

Add embellishments: small seashells on the tail, a seashell belly button, and shell bikini, hair piece, and bracelet.

The 8-year-old got into the sea theme and made a fishy friend for our mermaid.
I'm planning to hang the mermaid outside, on a protected wall. She should do fine during the dry season; the glue dots and alcohol inks might not hold up in the rain. The best part: because she's poseable, and the metal is soft and bendable, you can change her position depending on your mood. Interactive art indeed.

Saturday, March 19, 2011

Week 12: Hamantaschen

This Sunday, March 20 is the Jewish holiday of Purim. We celebrate our victory over the evil villain Haman in ancient Persia by dressing in costumes, giving gifts of food, and making the iconic Purim pastry: hamantaschen. These triangular pastries, traditionally made with fruit or poppyseed filling, are easy to come by in my hometown of Los Angeles. In San Jose, not so much. So I conquered my fear of dough and rolling pins this week by attempting hamantaschen for the first time. Here's how to make them -- no baking experience required.
Apricot and chocolate hamantaschen
What You Need
For the dough:
(dough recipe adapted from Entree to Judaism: A Culinary Exploration of the Jewish Diaspora by Tina Wasserman)

  • 1 stick (4 ounces) unsalted butter at room temperature
  • 1/2 cup sugar
  • 2 large eggs
  • 1/2 teaspoon vanilla extract
  • grated zest from 1/2 orange
  • 2 cups all-purpose flour
  • 1 teaspoon baking powder
  • 1/4 teaspoon salt
  • confectioner's sugar

For the apricot filling:
(filling recipe from Gale Gand on foodnetwork.com)

  • 2 cups finely chopped dried apricots
  • 1-1/3 cups orange juice
  • 2/3 cup honey
  • grated zest from 1/2 orange

For the chocolate filling:

  • Trader Joe's semi-sweet chocolate callets (chocolate disks for baking)

Equipment:

  • cookie sheet
  • parchment paper
  • 2-1/2 or 3-inch round cookie cutter
  • electric mixer
  • rolling pin

Preheat oven to 350 degrees. Line the cookie sheets with parchment paper.

Cream the butter and sugar together with an electric mixer until thoroughly combined. Add the eggs, vanilla, and orange zest, and beat until lighter in color and fluffy. Add the flour, baking powder, and salt, and mix until the mixture starts to hold together.

Gently knead the dough on a lightly floured surface about ten times, or just until the dough is smooth and holds together. Cover with plastic wrap and refrigerate for at least 15 minutes.

While the dough is cooling in the refrigerator, make the apricot filling. Place the filling ingredients in a saucepan and bring to a boil. Reduce heat and simmer, uncovered, for about 15 minutes or until the orange juice is absorbed. Let the filling cool a little before proceeding.
Let the apricots absorb the orange juice.
Roll the dough out on a board lightly covered with confectioner's sugar, which will slightly glaze the baked cookie and make it a little sweeter. Work with part of the dough at a time, keeping the rest refrigerated so that it stays cool. Cut the dough out into circles with the cookie cutter.
Cutting out the dough. Notice that the rolling pin technique here is not perfect, and neither is the cut-out circle. Taste-wise, that didn't make a bit of difference in the final hamantaschen.
For the apricot filling: place about a teaspoon of filling in the center of each circle. Be generous with the filling. Store-bought hamantaschen are notorious for being mostly dough, with just a teeny dab of filling inside. When making them at home, you can top 'em up with as much filling as you like.
Adding the filling

For the chocolate filling: place three chocolate callets in the center of each circle.

Shape into triangles by pushing two of the outer sides of dough upward toward each other, then pushing the bottom part of the dough up to form the bottom of the triangle. Pinch the dough seams together at each corner of the triangle, letting the filling show in the middle.
Making a triangle shape
Bake 15 minutes or until golden. Makes approximately 1-1/2 dozen hamantaschen.