Sunday, July 31, 2011

Project 26: Mixed-Media Collage

This weekend, the one and only Tim Holtz was at Scrapbook Island, a San Jose scrapbooking store. Tim Holtz - creative director of Ranger Industries, the guy behind my favorite products - alcohol inks, distress inks, and an arsenal of mixed-media tools and inspiration. Here, in person - and not only here, but teaching a four-hour workshop! For the craft fangirl, this event was on a par with going to that Duran Duran concert as a teenager. And the sixty other cheering, boisterous ladies in the room felt the same.

The workshop theme: breaking through creative blocks. We started with four blank canvases and in the course of four hours, created this:

The finished collage
All the credit for this post goes to Tim, who walked us all through this project step by step - ever so patiently and incredibly enthusiastically.

Tim Holtz teaching the Creative Blocks workshop at Scrapbook Island
There are a ton of fun techniques in this project to get the creative juices flowing. This project uses a range of Tim Holtz and Ranger products (of course!). Rather than list them all here, I'll list the products used in each step.

We started out with a 6x12 inch canvas and three mini canvases: one rectangular and two differently sized squares, along with a bag of goodies and metal embellishments: a mini broken porcelain statue, game pieces, foliage, hinge clip, pen nib, glass bottle, glitter, wire, keys, lock, metal borders, and more.
Place the mini canvases wherever you like on the larger canvas, leaving enough room between the canvases to add a paper border.
Mark the canvas placement with a 4B graphite pencil.
Using a ruler (here, the Tim Holtz Tool Design Ruler), sketch in lines connecting the the canvas squares, in any pattern you like.
Lay the canvases on pieces of cut-up dictionary paper that are sized a few inches larger than each canvas.
Using an adhesive (here, Claudine Hellmuth Multi-Medium) spread glue on the face and sides of each canvas, then stick each canvas down on the center of each paper.
Fold up the sides of the paper and pinch the edges.
Tear off the edges, then spread adhesive on the wood canvas backs, pressing the dictionary paper down onto the backs. We now have some lovely wrapped canvases. Set them aside to dry for a bit.
Taking scrapbook paper (here, from the Tim Holtz Idea-ology collection), tear off paper to fit inside each area you marked (except for the canvas areas, marked with an X). Use the ruler as a guide for tearing. Note that no scissors are used in this project!
Here's the set of torn papers, in a map, ruler, and letter motif.
Glue the papers down with Multi-Medium and let dry for a few minutes.
Turn your attention back to the dictionary canvases. Take a Distress Ink pad and tap it with the foam end of a Ranger Ink Blending Tool. Then rub the ink into the paper with the tool. 
Build up several layers of different colors for an antiqued effect. Keep a few white spots, as in the center of the paper here, for a mottled and more authentic look.
Spray the canvases with Perfect Pearls Mist for some colored glittery shine. Set the canvases aside to dry.
Apply Idea-Ology Tissue Tape around the edges of the canvas, and ink with Distress Inks to antique.
Rub the graphite pencil around all the borders and use your finger to smudge the pencil, blurring the edges of each border.
Glue the canvases on with Multi-Medium.
For an optional layer of texture and interest, melt beeswax in a Melting Pot and spread a thin layer on quickly with a brush. It'll look opaque as it dries, as here, but if you're using colorless beeswax, it'll dry clear, giving the a dimensional look to the layers below.
Using acrylic paint (Adirondack Paint Dabbers, here), smear dabs of paint over the beeswax to add more interest. You can also use small dabs of paint to antique the embellishments, culled from meaningful scraps you've collected, or as here, from a collection of Idea-ology Findings. 
Position your embellishments and glue them on with Multi-Medium. Tell a story if you like - this one seems to involve a cryptic tale of keys, locks, time, and maps. Or heck - just play.
Creative blocks unblocked - thanks, Tim!

Wednesday, June 29, 2011

Project 25: Four-Strand Lanyard

It's late June - time for the quintessential kids' summertime craft. Called variously lanyards, boondoggle, or gimp, these woven keychains are fun and relaxing to make, both for kids and grown-ups.

Because they're a ubiquitous summer camp staple, you might think they're a piece of cake to make. They are - once you get them started. So, this project will focus closely on both starting and finishing a lanyard - the hardest parts. We'll work with the basic four-strand lanyard: two different colors of craft lace, in a box stitch.

Summer camp staple: a four-string lanyard
What you need

  • plastic craft lace (Rexlace or similar, found at craft stores such as Michael's)
  • scissors
  • optional: keychain for the lanyard

What you need, clockwise from left: scissors, keychain, two different colors of craft lace
Start by cutting about a yard of each color lace, making sure the laces are the same length. Then follow the step-by-step photos:
Step 1: Put laces in a plus sign shape, crossing them in the middle.
Step 2: Bend the left side of the yellow lace to the right, over the pink lace.
Step 3: Bend the right side of the yellow lace over the pink lace. Now you have a top yellow lace that's crossing over to the right, and a bottom yellow lace that's crossing over to the left. Hold the laces down with your finger.
Step 4: Take the upper end of the pink lace and fold it down, over the top yellow lace and under the bottom yellow lace, keeping it toward the right. Notice how we're then moving the un-folded bottom half of the pink lace over to the left
Step 5: Then, take the lower end of the pink lace that you moved to the left, and fold it over the bottom yellow lace and under the top yellow lace, making sure it's on the left.
Step 6: Grab all the ends of the laces and pull them tight. You now have your first square box stitch!
Step 7: Now you can start stitching the rest of the lanyard. Hold up the lanyard so it's facing upward toward you. Fold one pink end toward you and the other away from you, and grasp the ends so that the middle pink laces stick up a little, as shown here.
Step 8: Pull the yellow lace on the right over and under, as before, keeping it to the right. 
Step 9: And then pull the yellow lace on the left over and under, keeping it to the left. Pull the laces tight.
Now's a good time to hook a keychain over the very bottom-most lace.
And then continue onward, lacing and pulling tight in the box stitch, until your lanyard is as long as you like.
When you're finished stitching, it's time to finish off the lanyard by pulling the laces through and then pulling them tight. Take a pink lace and push it under the closest pink lace, pulling it up through the center of the lanyard.
And continue around the lanyard, pushing each colored lace under and up through the nearest lace of the same color.
The finished lanyard

Tuesday, June 28, 2011

Project 24: Repurposed Greeting Cards

We all have them: tacky greeting cards from greeting card collections or misguided purchases, sitting around, never to be given to anyone because they're just too hideous. Or perhaps you have a collection of greeting cards given to you for birthdays and holidays that you can't bear to throw away.

Here's a way to turn the cards into something unique and new. Take these two hideous specimens below. By cutting out the bugs and flowers from one card, and the kitty from the other, we can create two brand-new cards that you won't be embarrassed to send.

Ugly greeting cards, awaiting transformation

What You Need

  • ugly greeting cards to cut up
  • blank greeting cards
  • paper scraps, stickers, trims, embellishments
  • pigment ink pad
  • decorative scissors and regular scissors
  • dimensional foam tape
  • glue stick

First, the most satisfying part: cut out the parts of the ugly cards that you would like to keep, and discard the rest.

Now, the challenge: how to make two new cards out of these bits of old cards. I stockpile decorative papers, images, felt shapes, and stickers. When I'm working on a card project, I pull out a bunch of papers and items with a similar theme and choose among them. Here's a stash below; I ended up not using most of the items, but just looking through them helped me plan the composition.
Cut out the parts of the cards you want to keep, and grab an assortment of scraps and embellishments to consider.
These two cards are for a young girl, so the plan is to keep them simple, bright, and cheerful. Starting with the cat card, the paper with colored circles caught my eye. A card with an inked background, overlaid with the paper, with the cat on top seemed like a good start.

Start by using an ink pad to color the paper, inking the paper directly with the ink pad.

Ink the paper directly with the ink pad
Use decorative scissors to cut out the paper. Glue it down with a glue stick, then affix the cut-out cat on top with dimensional foam tape. The dimensional tape helps the cat stick up a little, giving a bit of a 3-D look to the card. Alright, that's a good start to the card. We'll add more later.
First card in progress, with papers and image affixed
On to the second card. On this card, leave the background white, so as not to compete with the busy pattern of the printed paper we're using here. It's a funky nature-themed paper, perfect for the little bugs we'll add in.

Glue the paper down with a glue stick, then position the bugs on the card, some coming in from the edge, others pointing outward to give it a dynamic look.
Give paper an attractive edging with decorative scissors 
We're now ready to put the finishing touches on both cards. For the cat card, I added a decorative sticker border, and two big colored star stickers. Again, this is for a young girl, so the big, bright colors work. I finished it with glitter glue in a blue-green patina color, using it to rim both the edges of the paper and to add dots on the edges of the card, the stars, and the sticker border, tying the look together.

For the bug card, a felt flower with an added flower sticker in the middle added dimensionality and a different texture to the card. And no card is complete without a bit of shine; red Dresden foil trim at the bottom adds that shine and ties in with the red of the ladybugs.
The finished cards
That's two cards, repurposed! When creating cards, keep the age of the recipient in mind - this look wouldn't work for anyone over the age of ten. But you're sure to find old greeting cards that fit the occasion perfectly - once they're chopped up, of course.

Monday, June 27, 2011

Project 23: Terrarium

Terrariums are fascinating - mini-ecosystems, cramming color and life into a small enclosed glass space. I've been eager to make one but never knew where to start. On a weekend trip to San Francisco, I made time for a terrarium class at Paxton Gate, an eclectic San Francisco shop known for its taxidermied mice - and for its intriguing assortment of classes. Two hours later, I left with a terrarium, and the know-how to make my own in the future.

For this project, we'll be making a succulent terrarium that needs only infrequent watering.

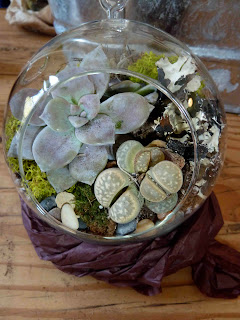
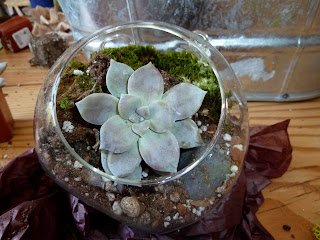
The finished terrarium. 
What you need

  • glass globe terrarium (you can find terrariums online at Paxton Gate or Flora Grubb Gardens)
  • succulents - two to three for a small terrarium as shown here; or more for a larger-sized terrarium
  • active charcoal
  • potting medium for cactus and succulents
  • rocks and stones of varying sizes
  • distilled water
  • small shovel or scoop that can fit inside the terrarium's opening

optional:

  • terrarium tweezer (available at Terrain) or extra-long craft tweezers
  • lichens and moss

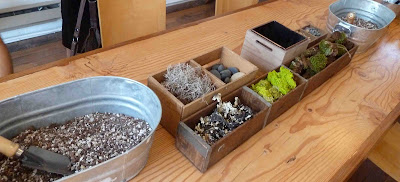
Some must-haves and nice-to-haves for your terrarium, clockwise from left: potting medium, Spanish moss, river stones, active charcoal, pebbles, another bucket of potting medium, mood moss (at bottom right), reindeer lichen, black lichen
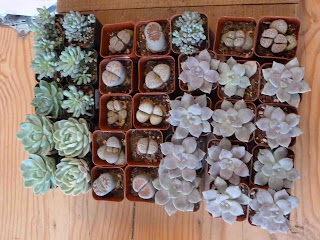
Here's an assortment of succulents. I used echeveria and lithops for this terrarium.
We start with our empty glass terrarium, keeping these long tweezers handy to push in small plants and mosses. This terrarium has a large opening that you can see at the bottom left, and two smaller openings on the upper sides, allowing you to work with it at different angles.
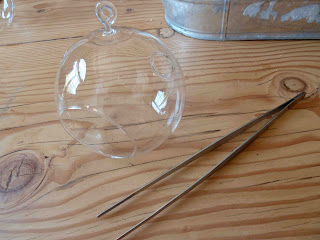
Terrarium and long tweezers
The first thing to put in our terrarium is a half-inch layer of charcoal. The charcoal acts as drainage for the water filtering down through the potting mix, keeping the potting mix from getting waterlogged.
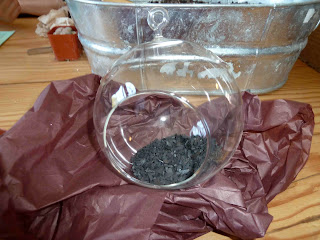
Active charcoal acts as a drainage layer at the bottom of the terrarium
We'll want to fill up as much of this little terrarium as we can with plants and pretty things to look at. To do that, we can angle the soil and plants up from the bottom towards the back, so that they don't spill out of the opening in the front. Here's a view of the back of the terrarium. See how the soil starts to fill up part of the back; it's angled upwards from the front.

Put in less soil than you think you'll need; you can always add in more later. These little terrariums fill up quickly.
Terrarium seen from the back, with soil angling upward.
Once you have an initial layer of soil in, start adding in some mosses. The best part of creating a terrarium is being a landscape architect on a miniature scale. Think about your composition as you add in the plants and mosses.

In the preceding photo, you can see the backside of some mood moss, a thick, clumping, grassy-looking moss. We're using that as a bolster for our composition at the back of the terrarium.

In the photo below, you can see the green mood moss from the front. It makes a lovely background for the silvery succulents. Then, add in a larger rock as another anchor for your composition. In the photo below, you can see a gray stone at the bottom right; I ended up moving it to the back at the top later on.

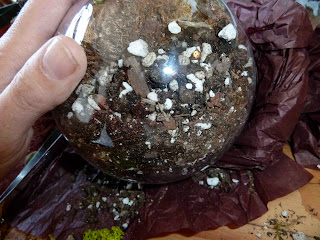
Time to add in your plants. There's less room in the terrarium than you would think; two or three plants is all that can fit in here. Use the smallest container size of succulent that you can find at your local nursery.

Squeeze the container gently to release the plant, and brush excess soil away from the roots. Carefully place the plant into the terrarium, filling in with extra soil around the plant to cover the roots. Do the same for the other succulents you're using, placing them in a nice composition, with larger ones toward the back and smaller plants toward the front.

Placing moss and succulents.
When the succulents are all placed and the roots are covered with soil, it's time to have fun with mosses, sticks, pebbles, and anything else that would make for a pretty, natural composition. For this terrarium, I added black lichen, which you can see to the right of the terrarium below. The back and sides are enhanced with sprigs of bright green reindeer lichen. At the back on top, there's some Spanish moss. And at the bottom front, you can see assorted colored pebbles. The long tweezers are handy for moving around little pieces of moss and lichen.

There are different things to see from almost any angle of viewing this terrarium. The only part that's not that hot looking is the backside, where we backfilled the soil up at an angle.

Our terrarium's almost done. Now we just need to give it its first watering. Because terrariums are such small, enclosed ecosystems without drainage, the salts and minerals from tap water can be damaging to the plants. You'll want to use distilled water or rainwater to water your terrarium. The easiest way to water a terrarium of this shape is to use a spray bottle or turkey baster, spraying the soil till it's damp. Once it's damp (not soaked), pat it down and settle in the plants more firmly. Wipe any water overspray off the inside walls with a paper towel.

For succulents, you can wait till the soil's dry before watering again.

Place your terrarium in an area that gets sunlight or bright artificial light, but not steady, hot sun - the glass walls magnify the sun's heat and can burn the plants.

And one more terrarium perk: if you want a different composition, you can rearrange the mosses, lichens, and stones for a different effect whenever you like.