Wednesday, June 29, 2011

Project 25: Four-Strand Lanyard

It's late June - time for the quintessential kids' summertime craft. Called variously lanyards, boondoggle, or gimp, these woven keychains are fun and relaxing to make, both for kids and grown-ups.

Because they're a ubiquitous summer camp staple, you might think they're a piece of cake to make. They are - once you get them started. So, this project will focus closely on both starting and finishing a lanyard - the hardest parts. We'll work with the basic four-strand lanyard: two different colors of craft lace, in a box stitch.

Summer camp staple: a four-string lanyard
What you need

  • plastic craft lace (Rexlace or similar, found at craft stores such as Michael's)
  • scissors
  • optional: keychain for the lanyard

What you need, clockwise from left: scissors, keychain, two different colors of craft lace
Start by cutting about a yard of each color lace, making sure the laces are the same length. Then follow the step-by-step photos:
Step 1: Put laces in a plus sign shape, crossing them in the middle.
Step 2: Bend the left side of the yellow lace to the right, over the pink lace.
Step 3: Bend the right side of the yellow lace over the pink lace. Now you have a top yellow lace that's crossing over to the right, and a bottom yellow lace that's crossing over to the left. Hold the laces down with your finger.
Step 4: Take the upper end of the pink lace and fold it down, over the top yellow lace and under the bottom yellow lace, keeping it toward the right. Notice how we're then moving the un-folded bottom half of the pink lace over to the left
Step 5: Then, take the lower end of the pink lace that you moved to the left, and fold it over the bottom yellow lace and under the top yellow lace, making sure it's on the left.
Step 6: Grab all the ends of the laces and pull them tight. You now have your first square box stitch!
Step 7: Now you can start stitching the rest of the lanyard. Hold up the lanyard so it's facing upward toward you. Fold one pink end toward you and the other away from you, and grasp the ends so that the middle pink laces stick up a little, as shown here.
Step 8: Pull the yellow lace on the right over and under, as before, keeping it to the right. 
Step 9: And then pull the yellow lace on the left over and under, keeping it to the left. Pull the laces tight.
Now's a good time to hook a keychain over the very bottom-most lace.
And then continue onward, lacing and pulling tight in the box stitch, until your lanyard is as long as you like.
When you're finished stitching, it's time to finish off the lanyard by pulling the laces through and then pulling them tight. Take a pink lace and push it under the closest pink lace, pulling it up through the center of the lanyard.
And continue around the lanyard, pushing each colored lace under and up through the nearest lace of the same color.
The finished lanyard

Tuesday, June 28, 2011

Project 24: Repurposed Greeting Cards

We all have them: tacky greeting cards from greeting card collections or misguided purchases, sitting around, never to be given to anyone because they're just too hideous. Or perhaps you have a collection of greeting cards given to you for birthdays and holidays that you can't bear to throw away.

Here's a way to turn the cards into something unique and new. Take these two hideous specimens below. By cutting out the bugs and flowers from one card, and the kitty from the other, we can create two brand-new cards that you won't be embarrassed to send.

Ugly greeting cards, awaiting transformation

What You Need

  • ugly greeting cards to cut up
  • blank greeting cards
  • paper scraps, stickers, trims, embellishments
  • pigment ink pad
  • decorative scissors and regular scissors
  • dimensional foam tape
  • glue stick

First, the most satisfying part: cut out the parts of the ugly cards that you would like to keep, and discard the rest.

Now, the challenge: how to make two new cards out of these bits of old cards. I stockpile decorative papers, images, felt shapes, and stickers. When I'm working on a card project, I pull out a bunch of papers and items with a similar theme and choose among them. Here's a stash below; I ended up not using most of the items, but just looking through them helped me plan the composition.
Cut out the parts of the cards you want to keep, and grab an assortment of scraps and embellishments to consider.
These two cards are for a young girl, so the plan is to keep them simple, bright, and cheerful. Starting with the cat card, the paper with colored circles caught my eye. A card with an inked background, overlaid with the paper, with the cat on top seemed like a good start.

Start by using an ink pad to color the paper, inking the paper directly with the ink pad.

Ink the paper directly with the ink pad
Use decorative scissors to cut out the paper. Glue it down with a glue stick, then affix the cut-out cat on top with dimensional foam tape. The dimensional tape helps the cat stick up a little, giving a bit of a 3-D look to the card. Alright, that's a good start to the card. We'll add more later.
First card in progress, with papers and image affixed
On to the second card. On this card, leave the background white, so as not to compete with the busy pattern of the printed paper we're using here. It's a funky nature-themed paper, perfect for the little bugs we'll add in.

Glue the paper down with a glue stick, then position the bugs on the card, some coming in from the edge, others pointing outward to give it a dynamic look.
Give paper an attractive edging with decorative scissors 
We're now ready to put the finishing touches on both cards. For the cat card, I added a decorative sticker border, and two big colored star stickers. Again, this is for a young girl, so the big, bright colors work. I finished it with glitter glue in a blue-green patina color, using it to rim both the edges of the paper and to add dots on the edges of the card, the stars, and the sticker border, tying the look together.

For the bug card, a felt flower with an added flower sticker in the middle added dimensionality and a different texture to the card. And no card is complete without a bit of shine; red Dresden foil trim at the bottom adds that shine and ties in with the red of the ladybugs.
The finished cards
That's two cards, repurposed! When creating cards, keep the age of the recipient in mind - this look wouldn't work for anyone over the age of ten. But you're sure to find old greeting cards that fit the occasion perfectly - once they're chopped up, of course.

Monday, June 27, 2011

Project 23: Terrarium

Terrariums are fascinating - mini-ecosystems, cramming color and life into a small enclosed glass space. I've been eager to make one but never knew where to start. On a weekend trip to San Francisco, I made time for a terrarium class at Paxton Gate, an eclectic San Francisco shop known for its taxidermied mice - and for its intriguing assortment of classes. Two hours later, I left with a terrarium, and the know-how to make my own in the future.

For this project, we'll be making a succulent terrarium that needs only infrequent watering.
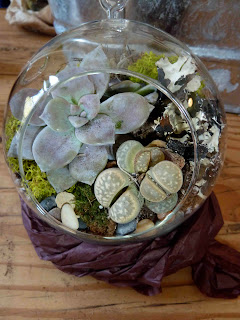
The finished terrarium. 
What you need

  • glass globe terrarium (you can find terrariums online at Paxton Gate or Flora Grubb Gardens)
  • succulents - two to three for a small terrarium as shown here; or more for a larger-sized terrarium
  • active charcoal
  • potting medium for cactus and succulents
  • rocks and stones of varying sizes
  • distilled water
  • small shovel or scoop that can fit inside the terrarium's opening

optional:

  • terrarium tweezer (available at Terrain) or extra-long craft tweezers
  • lichens and moss

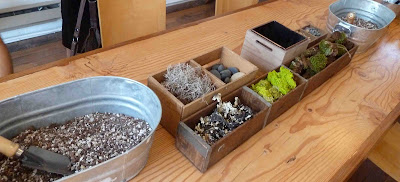
Some must-haves and nice-to-haves for your terrarium, clockwise from left: potting medium, Spanish moss, river stones, active charcoal, pebbles, another bucket of potting medium, mood moss (at bottom right), reindeer lichen, black lichen
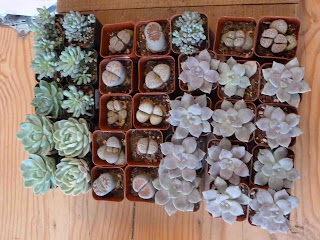
Here's an assortment of succulents. I used echeveria and lithops for this terrarium.
We start with our empty glass terrarium, keeping these long tweezers handy to push in small plants and mosses. This terrarium has a large opening that you can see at the bottom left, and two smaller openings on the upper sides, allowing you to work with it at different angles.
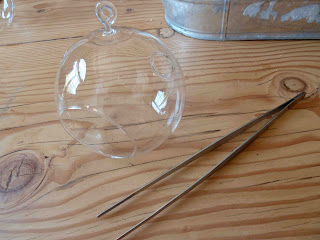
Terrarium and long tweezers
The first thing to put in our terrarium is a half-inch layer of charcoal. The charcoal acts as drainage for the water filtering down through the potting mix, keeping the potting mix from getting waterlogged.
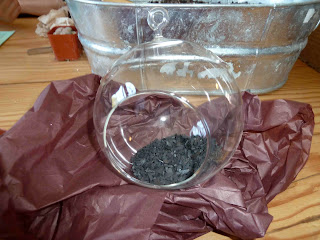
Active charcoal acts as a drainage layer at the bottom of the terrarium
We'll want to fill up as much of this little terrarium as we can with plants and pretty things to look at. To do that, we can angle the soil and plants up from the bottom towards the back, so that they don't spill out of the opening in the front. Here's a view of the back of the terrarium. See how the soil starts to fill up part of the back; it's angled upwards from the front.

Put in less soil than you think you'll need; you can always add in more later. These little terrariums fill up quickly.
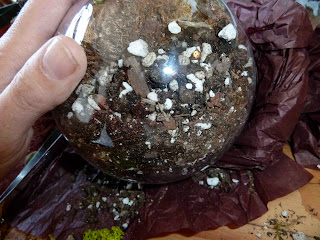
Terrarium seen from the back, with soil angling upward.
Once you have an initial layer of soil in, start adding in some mosses. The best part of creating a terrarium is being a landscape architect on a miniature scale. Think about your composition as you add in the plants and mosses.

In the preceding photo, you can see the backside of some mood moss, a thick, clumping, grassy-looking moss. We're using that as a bolster for our composition at the back of the terrarium.

In the photo below, you can see the green mood moss from the front. It makes a lovely background for the silvery succulents. Then, add in a larger rock as another anchor for your composition. In the photo below, you can see a gray stone at the bottom right; I ended up moving it to the back at the top later on.

Time to add in your plants. There's less room in the terrarium than you would think; two or three plants is all that can fit in here. Use the smallest container size of succulent that you can find at your local nursery.

Squeeze the container gently to release the plant, and brush excess soil away from the roots. Carefully place the plant into the terrarium, filling in with extra soil around the plant to cover the roots. Do the same for the other succulents you're using, placing them in a nice composition, with larger ones toward the back and smaller plants toward the front.
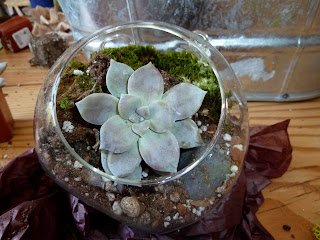
Placing moss and succulents.
When the succulents are all placed and the roots are covered with soil, it's time to have fun with mosses, sticks, pebbles, and anything else that would make for a pretty, natural composition. For this terrarium, I added black lichen, which you can see to the right of the terrarium below. The back and sides are enhanced with sprigs of bright green reindeer lichen. At the back on top, there's some Spanish moss. And at the bottom front, you can see assorted colored pebbles. The long tweezers are handy for moving around little pieces of moss and lichen.

There are different things to see from almost any angle of viewing this terrarium. The only part that's not that hot looking is the backside, where we backfilled the soil up at an angle.

Our terrarium's almost done. Now we just need to give it its first watering. Because terrariums are such small, enclosed ecosystems without drainage, the salts and minerals from tap water can be damaging to the plants. You'll want to use distilled water or rainwater to water your terrarium. The easiest way to water a terrarium of this shape is to use a spray bottle or turkey baster, spraying the soil till it's damp. Once it's damp (not soaked), pat it down and settle in the plants more firmly. Wipe any water overspray off the inside walls with a paper towel.

For succulents, you can wait till the soil's dry before watering again.

Place your terrarium in an area that gets sunlight or bright artificial light, but not steady, hot sun - the glass walls magnify the sun's heat and can burn the plants.

And one more terrarium perk: if you want a different composition, you can rearrange the mosses, lichens, and stones for a different effect whenever you like.

Saturday, June 4, 2011

Week 22: Common-Sense Scrapbooking

Whenever the topic of scrapbooking comes up in mom conversations, it usually goes like this: "I have albums for my first child, but since the second one was born, I haven't done anything." For those of us with no children, or just one, it's still hard to find the time. Photos pile up in boxes, to be sorted "later." Or they get uploaded to the computer and then pile up on your hard drive.

And then: how do you even do this scrapbooking thing? The Creative Memories version of scrapbooking has us create artistic spreads for each moment in our lives or our child's lives. Beautiful papers, stickers, printed sayings, borders. Ack! Too much overhead for most of us.

Here's how to scrapbook the common-sense way.

A simple scrapbook spread - no fuss, no fancy papers
What you need
  • scrapbook album with cardstock pages (Kolo makes great ones)
  • printed photos
  • Glue Dots or photo splits
  • mementos from the trip or event: ticket stubs, maps, restaurant menus, cards
  • optional: plastic page protectors
What you need, clockwise from left: scrapbook album, photo splits, photos
The first thing to start doing, even before your trip or event is over, is to make sure to save mementos as you go. When you go to a memorable restaurant, save the receipt, menu, or the restaurant's business card. Save notes, brochures, movie ticket stubs, bar coasters - anything that reminds you of a special time in your trip or event.

Then, keep all the mementos gathered together in a folder while you sort through your digital photos. On a Mac, you can flag photos in iPhoto and then can export them directly to Shutterfly using the Export option under the File menu. Before exporting, you can do some cleanup, cropping, and red-eye removal via the iPhoto Edit option.

Once the printed photos arrive, you're ready to begin.

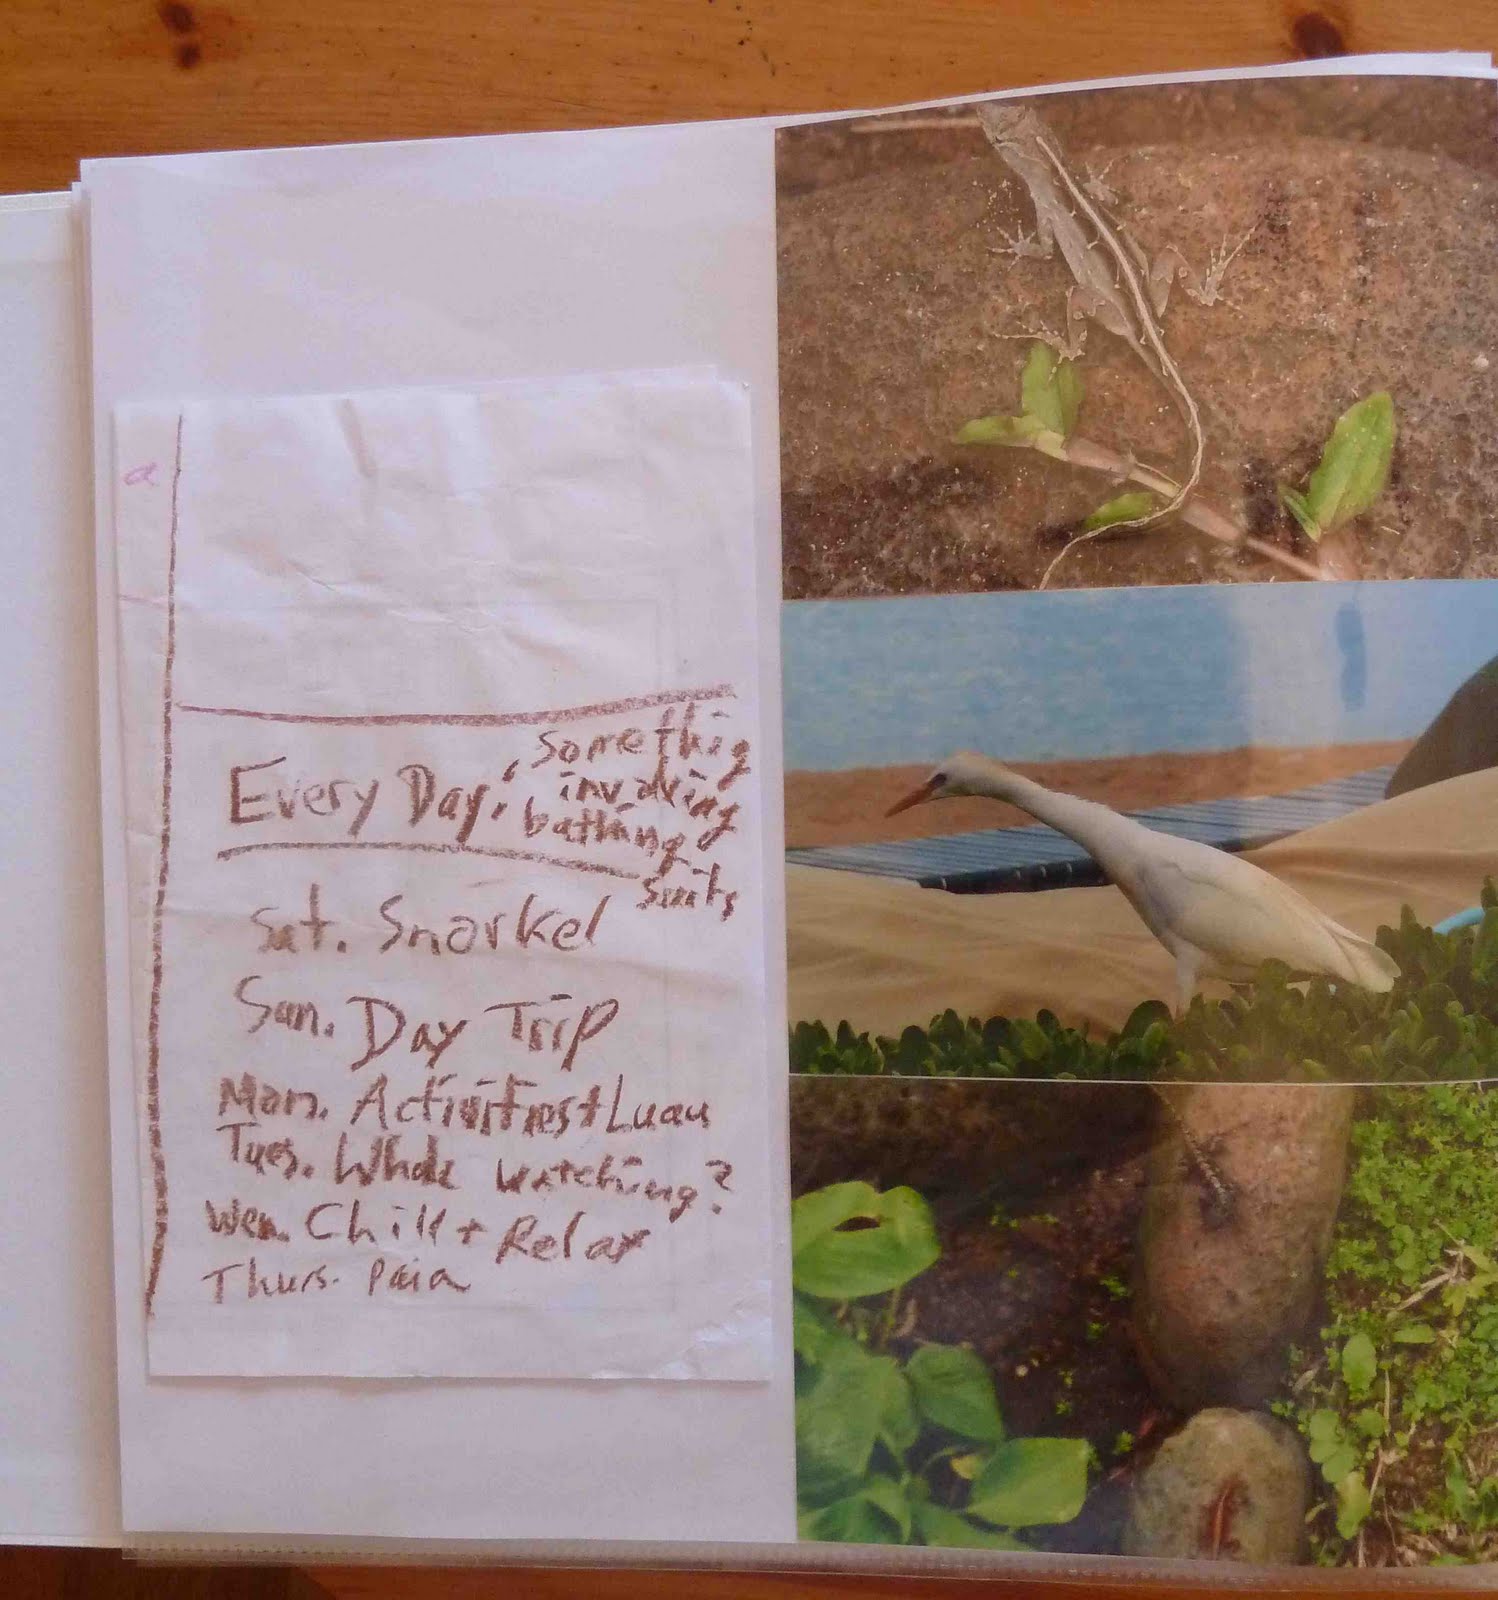
Put glue dots or photo splits on the back corners of each photo and stick them down. You can use photo corners instead if you need to remove the photos later. Try for a balance of photos and mementos on your pages. This page stacks three nature photos next to my daughter's handwritten trip itinerary ("Chill + relax"!).
Photos don't have to be straight up and down. You can get a little fancy and angle them in different directions. If you have enough photos to do so, it's a nice look to try for one theme per page. This is the luau page; as you saw, the preceding page photo had a nature theme. 
Try for a dynamic look on two page spreads - they can be matching in the way you display the photos, or different, as here. The left page stacks a bunch of mementos and photos together. The right page is more spare with five photos arranged in precise rows.
You can add a little scrapbook border at the bottom, as with this whale border. You can really get sucked into borders, stickers, and pretty papers to add pizzazz to your scrapbooks. That's wonderful - just don't let the additional overhead of gathering all those materials prevent you from scrapbooking in the first place.
Happy scrapbooking!

Friday, May 27, 2011

Week 21: Odds and Ends Art

After a few creative projects, soon enough you're left with leftover  bits and pieces. My pile is ever-expanding - Fashion Rock (you'll meet her sooner or later), clay art, mini art pieces made from shipping tags, assorted semi-precious stones for jewelry making . . . Well, this week, I consolidated some clutter. Not so coincidentally, some of those odds and ends were from the last few weeks of make52 projects.

Four different creative projects - combined!
This week's project isn't so much a tutorial to follow rather than a way to get you thinking about what you can do with those bits and pieces that don't have a home.

What you need
Leftover pieces from creative projects. I used:

  • a rescued frame that I'd sanded, painted, and embellished with beads
  • glitter paper from Week 20
  • six-piece clay painting from Week 19
  • watercolor paper painted with watercolor washes in yellow, pink, and purple
  • scissors, ruler, pencil, and double-sided foam tape
  • cardboard for frame backing

What you need, clockwise from left: glitter paper, frame, foam tape, scissors, six-piece painting, watercolor paper

I was looking for a bright, cheerful way to display the clay painting, so I hit on the idea of doing a funky double-matted look with the clay on top of the watercolor paper on top of the glitter paper. The warm colors of the watercolor paper, on top of the cool blue tones of the glitter paper, complement the clay pieces nicely.

You could glue the pieces together but I just used double-sided foam tape to make each piece stick up just a little bit higher than the paper it was on top of. Here's how to apply the tape backing:

That's really it. I stuck the clay on top of the watercolor paper, and the watercolor paper on top of the glitter paper. Then I put them in the frame, which again fits in with the fun, colorful theme. I cut a piece of cardboard for frame backing, and there you go: four separate art projects, smushed into one!

Friday, May 20, 2011

Week 20: Glitter Paper

I have a weakness for shiny things and for fancy papers. It can become an expensive habit - that thick, shiny, pretty glitter paper you find at scrapbooking and craft stores isn't cheap. So I got to thinking: I've got glittery embossing powder. I've got cardstock. How hard would it be to make my own?

Not too hard, it turns out. With a heat tool (not a hairdryer - you need a craft heat gun) and embossing powder, you can make as much glitter paper as you like, keeping it handy to glam up craft projects and cards. Here's how to do it!
Homemade shiny glitter paper

What you need

  • cardstock
  • embossing powder
  • pigment ink
  • heat tool

What you need, clockwise from left: cardstock, embossing powder, pigment ink, heat tool

Let's get started!
Start by inking part of your paper with pigment ink. Use a slow-drying ink: it needs to stay wet long enough for the embossing powder to stick to.
Sprinkle embossing powder over the inked areas of the paper. I'm using a combination of silver and blue powders here. The powder will stick to the damp ink.
Pour off the excess powder onto a piece of scrap paper and save it for later use. 
Turn on your heat tool and point it at the paper, keeping it a few inches above the paper.  You'll see the embossing powder start to melt and turn shiny. As soon as it melts, move your heat tool to another area of the paper, embossing until all the powder is melted onto the paper.
Continue inking and embossing until the entire paper is covered. It probably will look uneven and blotchy. That's okay -we're going to do another round!
Again, working in sections, re-ink part of the paper. It's actually easier to ink and emboss the second time now that the paper is already covered with embossing.
For the second pass, I used only blue powder. The silver powder peeks through, creating a nice shiny contrast.
And here's the finished paper, shiny and silvery-blue, and ready to use in a craft project!

Friday, May 13, 2011

Week 19: Six-Piece Painting

This week's project was a cascading series of disasters. I had this plan of creating a grid of clay tiles, with each tile being part of a picture. I planned to do a photo transfer onto the clay tiles, then embellish and display them in a grouping.

So pretty much everything went wrong. I used the wrong kind of clay - "Sculpey Light," which it turns out doesn't have the same properties as regular Sculpey clay. This messed everything up: the image transfer failed, and my attempts to fix it with ink and markers tanked as well.

But you know what? It came out looking just fine in the end. With a coat of acrylic paint, it's now a painting, rather than a photo. Here's how it all went down . . .


What you need

  • Sculpey clay (not Sculpey Light as shown here)
  • Liquid Sculpey
  • bone folder
  • t-shirt transfer paper
  • pencil and ruler (to create grid lines)
  • rolling pin
  • x-acto knife and self-healing cutting mat
  • acrylic paint
  • paintbrushes and palette paper
  • acrylic gloss varnish

What you need, clockwise from left: acrylic gloss varnish, Liquid Sculpey, rolling pin, acrylic paints, palette paper, painbrushes, bone folder, x-acto knife, ruler, t-shirt transfer paper, self-healing cutting mat, Sculpey clay

Start by using an image editing program to flip your photo - it will render as a mirror image after transferring to the clay.
Flip your photo, then print it out on the photo transfer paper.
Turn the paper over and draw in gridlines. Number the rectangles so that you can keep track of where each clay piece goes.
Cut out the rectangles, then roll out the clay to a 1/4 inch thickness using a rolling pin. Spread some Liquid Sculpey on the clay (it helps the image adhere to the clay) and press the rectangles face down on the clay. Use the bone folder to smooth and press the photo down.
Cut out the clay rectangles with an x-acto knife on the cutting mat.
One you've cut out your rectangles, bake as directed on the clay instructions. Cover the clay with a pie tin and clamp the edges, so that the clay polymers don't off-gas into your oven.

When your clay is baked, pull off the t-shirt paper backing and - ta-da! - your images will be revealed. Pencil the number of each image on the back of the clay so that you can continue to keep track of which image goes where.

Here's where everything went downhill. This Sculpey Light stuff leached most of the color out of the image transfer. Instead of the pretty beach scene, it was a gray apocalyptic landscape. And the image transfer didn't stick well to the clay - there were some huge bare areas where the transfer paper pulled off.

Plus, there were far too many pieces for this clay art piece. I ditched most of them and just used the six central pieces.
Desperate, I tried to add in some color by rubbing pigment ink over the image.
But the pigment ink came out kind of cruddy, and didn't evenly cover the bare areas. I added some marker too, but it still didn't do the trick. It looks better but not even close to where it needs to be.
Acrylic paint to the rescue! I chose colors similar to the photo  and repainted the whole thing.
And here's the final piece after painting on two layers of acrylic varnish to protect and seal the piece, and to add shine.
Finally, I have a nifty looking six-piece art sculpture thingy. I'm planning to hang this on my wall with a funky frame.

If at first you don't succeed . . . well . . . do whatever you can to get it to work!