Saturday, June 4, 2011

Week 22: Common-Sense Scrapbooking

Whenever the topic of scrapbooking comes up in mom conversations, it usually goes like this: "I have albums for my first child, but since the second one was born, I haven't done anything." For those of us with no children, or just one, it's still hard to find the time. Photos pile up in boxes, to be sorted "later." Or they get uploaded to the computer and then pile up on your hard drive.

And then: how do you even do this scrapbooking thing? The Creative Memories version of scrapbooking has us create artistic spreads for each moment in our lives or our child's lives. Beautiful papers, stickers, printed sayings, borders. Ack! Too much overhead for most of us.

Here's how to scrapbook the common-sense way.

A simple scrapbook spread - no fuss, no fancy papers
What you need
  • scrapbook album with cardstock pages (Kolo makes great ones)
  • printed photos
  • Glue Dots or photo splits
  • mementos from the trip or event: ticket stubs, maps, restaurant menus, cards
  • optional: plastic page protectors
What you need, clockwise from left: scrapbook album, photo splits, photos
The first thing to start doing, even before your trip or event is over, is to make sure to save mementos as you go. When you go to a memorable restaurant, save the receipt, menu, or the restaurant's business card. Save notes, brochures, movie ticket stubs, bar coasters - anything that reminds you of a special time in your trip or event.

Then, keep all the mementos gathered together in a folder while you sort through your digital photos. On a Mac, you can flag photos in iPhoto and then can export them directly to Shutterfly using the Export option under the File menu. Before exporting, you can do some cleanup, cropping, and red-eye removal via the iPhoto Edit option.

Once the printed photos arrive, you're ready to begin.

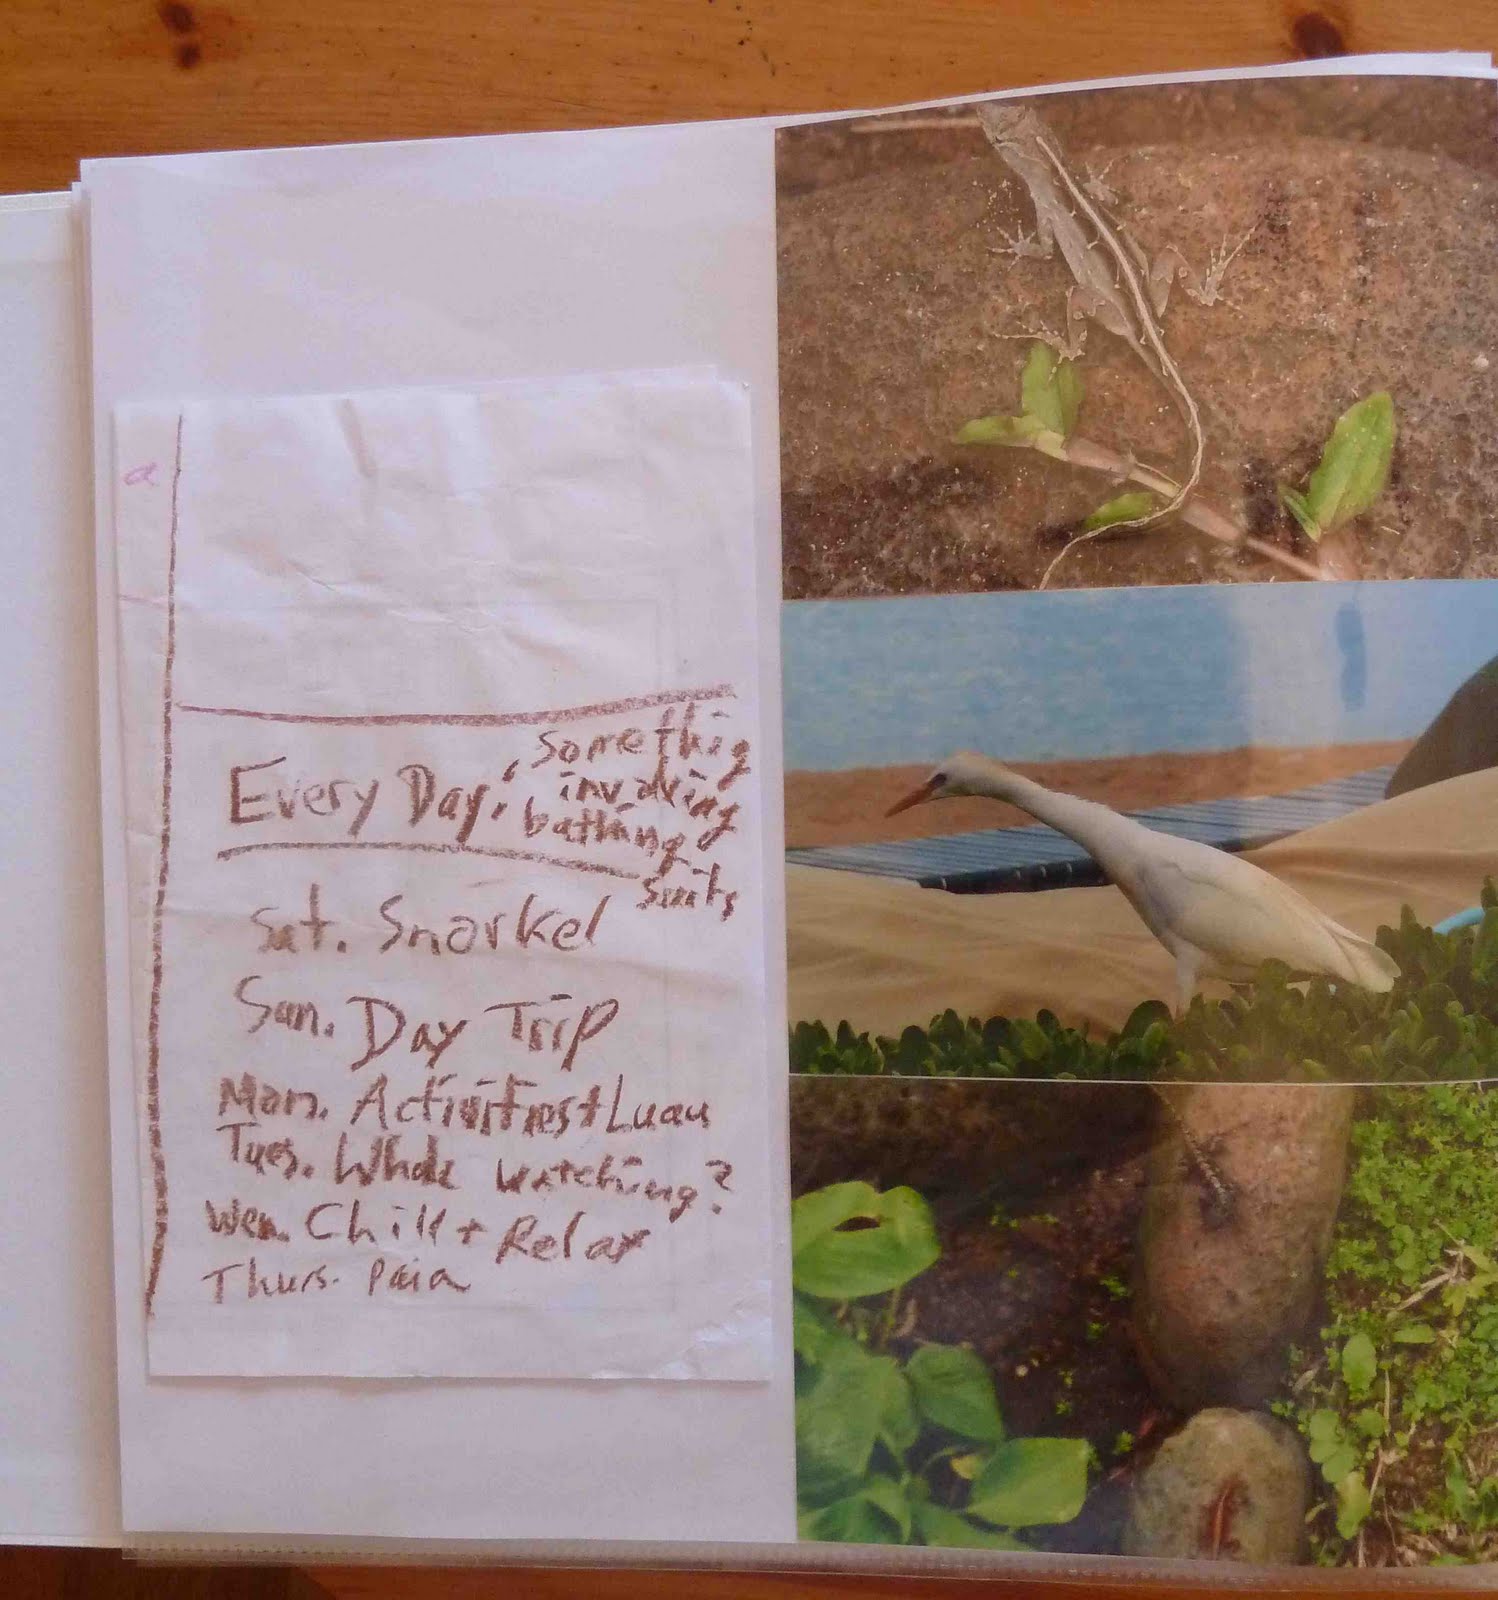
Put glue dots or photo splits on the back corners of each photo and stick them down. You can use photo corners instead if you need to remove the photos later. Try for a balance of photos and mementos on your pages. This page stacks three nature photos next to my daughter's handwritten trip itinerary ("Chill + relax"!).
Photos don't have to be straight up and down. You can get a little fancy and angle them in different directions. If you have enough photos to do so, it's a nice look to try for one theme per page. This is the luau page; as you saw, the preceding page photo had a nature theme. 
Try for a dynamic look on two page spreads - they can be matching in the way you display the photos, or different, as here. The left page stacks a bunch of mementos and photos together. The right page is more spare with five photos arranged in precise rows.
You can add a little scrapbook border at the bottom, as with this whale border. You can really get sucked into borders, stickers, and pretty papers to add pizzazz to your scrapbooks. That's wonderful - just don't let the additional overhead of gathering all those materials prevent you from scrapbooking in the first place.
Happy scrapbooking!

Friday, May 27, 2011

Week 21: Odds and Ends Art

After a few creative projects, soon enough you're left with leftover  bits and pieces. My pile is ever-expanding - Fashion Rock (you'll meet her sooner or later), clay art, mini art pieces made from shipping tags, assorted semi-precious stones for jewelry making . . . Well, this week, I consolidated some clutter. Not so coincidentally, some of those odds and ends were from the last few weeks of make52 projects.

Four different creative projects - combined!
This week's project isn't so much a tutorial to follow rather than a way to get you thinking about what you can do with those bits and pieces that don't have a home.

What you need
Leftover pieces from creative projects. I used:

  • a rescued frame that I'd sanded, painted, and embellished with beads
  • glitter paper from Week 20
  • six-piece clay painting from Week 19
  • watercolor paper painted with watercolor washes in yellow, pink, and purple
  • scissors, ruler, pencil, and double-sided foam tape
  • cardboard for frame backing

What you need, clockwise from left: glitter paper, frame, foam tape, scissors, six-piece painting, watercolor paper

I was looking for a bright, cheerful way to display the clay painting, so I hit on the idea of doing a funky double-matted look with the clay on top of the watercolor paper on top of the glitter paper. The warm colors of the watercolor paper, on top of the cool blue tones of the glitter paper, complement the clay pieces nicely.

You could glue the pieces together but I just used double-sided foam tape to make each piece stick up just a little bit higher than the paper it was on top of. Here's how to apply the tape backing:

That's really it. I stuck the clay on top of the watercolor paper, and the watercolor paper on top of the glitter paper. Then I put them in the frame, which again fits in with the fun, colorful theme. I cut a piece of cardboard for frame backing, and there you go: four separate art projects, smushed into one!

Friday, May 20, 2011

Week 20: Glitter Paper

I have a weakness for shiny things and for fancy papers. It can become an expensive habit - that thick, shiny, pretty glitter paper you find at scrapbooking and craft stores isn't cheap. So I got to thinking: I've got glittery embossing powder. I've got cardstock. How hard would it be to make my own?

Not too hard, it turns out. With a heat tool (not a hairdryer - you need a craft heat gun) and embossing powder, you can make as much glitter paper as you like, keeping it handy to glam up craft projects and cards. Here's how to do it!
Homemade shiny glitter paper

What you need

  • cardstock
  • embossing powder
  • pigment ink
  • heat tool

What you need, clockwise from left: cardstock, embossing powder, pigment ink, heat tool

Let's get started!
Start by inking part of your paper with pigment ink. Use a slow-drying ink: it needs to stay wet long enough for the embossing powder to stick to.
Sprinkle embossing powder over the inked areas of the paper. I'm using a combination of silver and blue powders here. The powder will stick to the damp ink.
Pour off the excess powder onto a piece of scrap paper and save it for later use. 
Turn on your heat tool and point it at the paper, keeping it a few inches above the paper.  You'll see the embossing powder start to melt and turn shiny. As soon as it melts, move your heat tool to another area of the paper, embossing until all the powder is melted onto the paper.
Continue inking and embossing until the entire paper is covered. It probably will look uneven and blotchy. That's okay -we're going to do another round!
Again, working in sections, re-ink part of the paper. It's actually easier to ink and emboss the second time now that the paper is already covered with embossing.
For the second pass, I used only blue powder. The silver powder peeks through, creating a nice shiny contrast.
And here's the finished paper, shiny and silvery-blue, and ready to use in a craft project!

Friday, May 13, 2011

Week 19: Six-Piece Painting

This week's project was a cascading series of disasters. I had this plan of creating a grid of clay tiles, with each tile being part of a picture. I planned to do a photo transfer onto the clay tiles, then embellish and display them in a grouping.

So pretty much everything went wrong. I used the wrong kind of clay - "Sculpey Light," which it turns out doesn't have the same properties as regular Sculpey clay. This messed everything up: the image transfer failed, and my attempts to fix it with ink and markers tanked as well.

But you know what? It came out looking just fine in the end. With a coat of acrylic paint, it's now a painting, rather than a photo. Here's how it all went down . . .


What you need

  • Sculpey clay (not Sculpey Light as shown here)
  • Liquid Sculpey
  • bone folder
  • t-shirt transfer paper
  • pencil and ruler (to create grid lines)
  • rolling pin
  • x-acto knife and self-healing cutting mat
  • acrylic paint
  • paintbrushes and palette paper
  • acrylic gloss varnish

What you need, clockwise from left: acrylic gloss varnish, Liquid Sculpey, rolling pin, acrylic paints, palette paper, painbrushes, bone folder, x-acto knife, ruler, t-shirt transfer paper, self-healing cutting mat, Sculpey clay

Start by using an image editing program to flip your photo - it will render as a mirror image after transferring to the clay.
Flip your photo, then print it out on the photo transfer paper.
Turn the paper over and draw in gridlines. Number the rectangles so that you can keep track of where each clay piece goes.
Cut out the rectangles, then roll out the clay to a 1/4 inch thickness using a rolling pin. Spread some Liquid Sculpey on the clay (it helps the image adhere to the clay) and press the rectangles face down on the clay. Use the bone folder to smooth and press the photo down.
Cut out the clay rectangles with an x-acto knife on the cutting mat.
One you've cut out your rectangles, bake as directed on the clay instructions. Cover the clay with a pie tin and clamp the edges, so that the clay polymers don't off-gas into your oven.

When your clay is baked, pull off the t-shirt paper backing and - ta-da! - your images will be revealed. Pencil the number of each image on the back of the clay so that you can continue to keep track of which image goes where.

Here's where everything went downhill. This Sculpey Light stuff leached most of the color out of the image transfer. Instead of the pretty beach scene, it was a gray apocalyptic landscape. And the image transfer didn't stick well to the clay - there were some huge bare areas where the transfer paper pulled off.

Plus, there were far too many pieces for this clay art piece. I ditched most of them and just used the six central pieces.
Desperate, I tried to add in some color by rubbing pigment ink over the image.
But the pigment ink came out kind of cruddy, and didn't evenly cover the bare areas. I added some marker too, but it still didn't do the trick. It looks better but not even close to where it needs to be.
Acrylic paint to the rescue! I chose colors similar to the photo  and repainted the whole thing.
And here's the final piece after painting on two layers of acrylic varnish to protect and seal the piece, and to add shine.
Finally, I have a nifty looking six-piece art sculpture thingy. I'm planning to hang this on my wall with a funky frame.

If at first you don't succeed . . . well . . . do whatever you can to get it to work!

Tuesday, May 3, 2011

Week 18: Triple Flower Mother's Day Card

Mother's Day is coming up, and you've got to give Mom a card. Will it be a store-bought Mother's Day card with sentiments written by someone else, or will it be a card handmade with love for the mothers and grandmothers and women in our lives who have mentored and loved us? Well duh. Obviously, we'll go with option #2.

My mother loves gardening, so this card is floral feast, with three kinds of flowers: a real, pressed flower, an image transfer flower image, and a "mom" decal on floral paper. Yum. Let's get started.
Three kinds of flowers on this mom's day card

What you need
For the pressed flowers:

  • flower press or big, heavy book
  • fresh flowers, preferably ones with few petals
For the image transfer:
  • magazine images
  • soft gloss gel (Liquitex)
  • paintbrush
  • small tray (a toaster oven tray works well)
For the card:
  • blank card and envelope
  • pigment ink (Palette)
  • scissors and decorative scissors
  • craft glue
  • collage glue (Mod Podge)
  • German foil trim (can be found online at 32 Degrees North)
  • double-sided foam tape
  • rubber stamp or sticker with a Mother's Day theme ("mom" or the like)


Some of the things you need, clockwise from left: craft glue, Mod Podge, scissors, craft scissors, blank card, German foil trim, flower press, pigment ink, stickers, double-sided foam tape

Step 1: Pressed flowers
Gather some flowers, and using a flower press, press the flowers between the leaves. Or, if you don't have a flower press, put them between the pages of a big, heavy book. Many-petaled flowers, such as roses, don't press as easily as small flowers such as pansies. This card uses a Lenten rose (hellebore).

After a few days, check your flowers. They should be pressed flat and dry to the touch before you use them.


Step 2: Image transfer
First we'll take a printed image and spiff it up so that it's card-worthy. We could just glue a cut-out magazine picture straight onto the card, but that's kind of tacky looking: it has that thin glossy magazine paper look, and there's other stuff on the back side of the image. We'll take the image and transfer it onto a hardened gel "skin" that we can then glue on to our card.
Brush a coat of gel over your images and let them dry. I'm doing a batch here, to use in other projects. Then brush on four more coats, letting each coat dry between applications. Each coat dries quickly - in about fifteen minutes.
When the last coat of gel is dry, put your image paper-side down into a tray filled with water. Let it soak for a minute or so, or until the paper is saturated.
Take out the image, turn it over, and start rubbing the paper away with your fingers. Presto! You can see the picture from the other side start to show through. Keep rubbing until you've removed all the paper. You can get any stray bits with a Magic Eraser.
Use decorative scissors to trim a pretty border around your image.

Step 3: Putting it all together

With our pressed flowers and image transfer ready to go, let's put all the pieces together and add some finishing touches.

Start by inking the borders of your card, leaving the middle clear. The image transfer becomes transparent, so if you have a dark-colored background, when you glue down the image, it'll look murky.
Add a little dimensional embellishment by cutting a small piece of floral paper and sticking a clear "Mom" sticker on it.
Glue the image transfer down with craft glue, and carefully glue the flower with collage glue (you can see the wet glue in this photo). Then take the little "Mom" embellishment and attach it with double-sided foam tape so that it sticks up a little.
The card didn't look quite done, so I added some blue German foil trim under the "Mom" and along the bottom of the card. Adding a little shiny trim really makes a difference. I also used a metallic pen to color the edges of the image transfer, adding some sparkle.

Happy Mother's Day, and happy card-making!

Wednesday, April 27, 2011

Week 17: Paper Casting with Kleenex

You've probably found plenty of uses for Kleenex. Nose blower, makeup remover, spill wiper - but how about art material?

The finished piece, with embossed suns created with . . . Kleenex.

Paper casting involves making dimensional forms with paper pulp and molds. We're going to do faux casting here, with Kleenex and rubber stamps. Much easier, less messy, and uses materials you already have around the house! The smooshiness of the Kleenex lends itself perfectly to embedding in the grooves of a rubber stamp. Using multiple layers of tissue, you end up with a 3-D, embossed image that you can then affix to paper and seal with a medium. Painting over it with metallic paint gives it a look similar to pressed-tin ceiling tiles.

This project is based on techniques learned in Teach Yourself Visually: Collage and Altered Art by Roni Johnson.

What you need

  • Kleenex
  • spray bottle
  • rubber stamp
  • pigment inks
  • polymer medium (Golden)
  • paintbrush
  • acrylic paints of your choice (I used antique bronze metallic paint, alizarin crimson, and hansa yellow)
  • cardstock

What you need, clockwise from left: spray bottle, polymer medium, Kleenex, paintbrush, acrylic paints, rubber stamp, pigment inks

Start by turning your rubber stamp face up and inking it thoroughly. The darker or more saturated the ink you use, the clearer your final image will be.
Cut pieces of Kleenex so that they overhang the edges of the stamp. Then press down a piece of tissue over the stamp and mist it thoroughly with the spray bottle.
Add another piece of Kleenex, mist it, and press down (don't rub; it'll tear the tissue). Keep pressing over the entire image; you'll see the stamped image start to show through. Continue adding tissue, misting, and pressing, using five tissues altogether. 
Pull up the wad of tissues. Your image will be clearly inked and embossed. Here, I inked the same image with four different inks. Clean your stamp pad with baby wipes in between colors, and let it dry.
Let the tissues dry for a while till they're damp but not soaking wet anymore. If you let them dry completely, then the tissues will separate, and your nice thick impression will be lost.
Once the tissues are damp to the touch, brush polymer medium on a piece of cardstock and press the casting down onto the cardstock. Then brush carefully over the top of the casting, sealing it down onto the paper. The medium acts as a sealant for the casting so that it doesn't separate, and it also enables you to paint over it later.
The sealed casting should dry overnight. The next day, you're ready to proceed.

Here are the sealed castings after drying. They're looking pretty good but they still have that "Kleenex-y" look around the edges. Time to fix that.
Using watered-down acrylic paint, start painting over your castings. Here I mixed alizarin crimson with metallic antique bronze. The metallic works particularly well on the castings, really highlighting the embossed texture.
At this point the casting is just about ready. I added some yellow to the castings after taking the preceding photo; as you can see in the finished picture below, the yellow was that missing touch that really helps the images pop out and gives the stamped suns some warmth.

When you're happy with the look of your casting, you can cut it out and use it for card-making or mixed media projects. I turned the castings into a little art piece here, using some leftover bits from other projects: a fused glass oblong and an art metal frame that's embossed and inked with alcohol inks (read more about that technique in Week 13).
The finished piece, using leftovers from other projects.
You can do paper casting with other materials besides Kleenex, but the few other options I tried - tissue paper and gampi paper - just don't have the pulpiness of facial tissue, and didn't come out as three-dimensional.

Besides, this is probably the prettiest Kleenex ever gets. Have fun!

Sunday, April 17, 2011

Week 16: Lei Making - Haku Style

In Week 15, we strung leis on thread. This week, we'll do a different style of lei making: a traditional braided lei, called haku style. Before thread and needles were introduced to Hawaii, one way to make leis was to braid the flowers into dampened ti leaves, creating a beautiful natural necklace or hair ornament. Ti leaves aren't as easily available as old bedsheets, though. So feel free to rip up some soft old sheets to long, thin lengths and use those instead.

Here's a flowered hair "scrunchy," woven with ti leaves and carnations:
You can attach this pretty braided hair ornament with bobby pins or tie underneath.
What You Need

  • carnation heads or flowers of your choice
  • damp ti leaves or long fabric strips (old bedsheets or light, soft fabric)
  • optional: hook and block of wood, for leverage

Start out by tearing your fabric, either long enough for a necklace length or shorter if you're going the flowered hairpiece route. Then tie one end, leaving a couple inches extra at the end.

It helps if you have something to use for leverage as you braid. In the class I took at the Kaanapali Beach Hotel, we used a block of wood with hooks screwed into it. We stuck the tied end over the hook, as seen here:

Ti leaves hooked onto a block of wood, for leverage
Then we could stand up and pull hard on the leaves, helping to pull each braid tight. If you don't have a block of wood set up, don't worry. Just go ahead and braid, making sure to pull each braid as tight as possible.

Start by braiding four braids. Then, on the fifth braid, start adding flowers. Add a flower for each left and right braid that you make. The bottom of the flower head should be pushed below the braid, and the top should be above.

Braid four times, then start braiding in the flowers to the left and to the right.
The only thing holding in the flowers is the tightness of the braid. Pull hard on each braid to make sure it's really tight after you add in each flower.

Here's how the lei looks from underneath. You can see how the bottoms of the flower heads poke out underneath each braid.
Finish the lei by braiding four times at the end (without flowers). Then tuck the middle piece of braid underneath and tie the left and right ends together, again leaving a couple inches of leaf or fabric at the ends. You can use these loose pieces to tie the lei together, or to attach to your head with bobby pins.
The finished lei hair "scrunchy." You can't see the braids from the top, as the flowers fan out over the braided areas.
It's beautiful and fragile; to prolong the life of your lei, put it in a paper bag in the fridge. And then spend one evening with the prettiest hair scrunchy you'll ever wear.